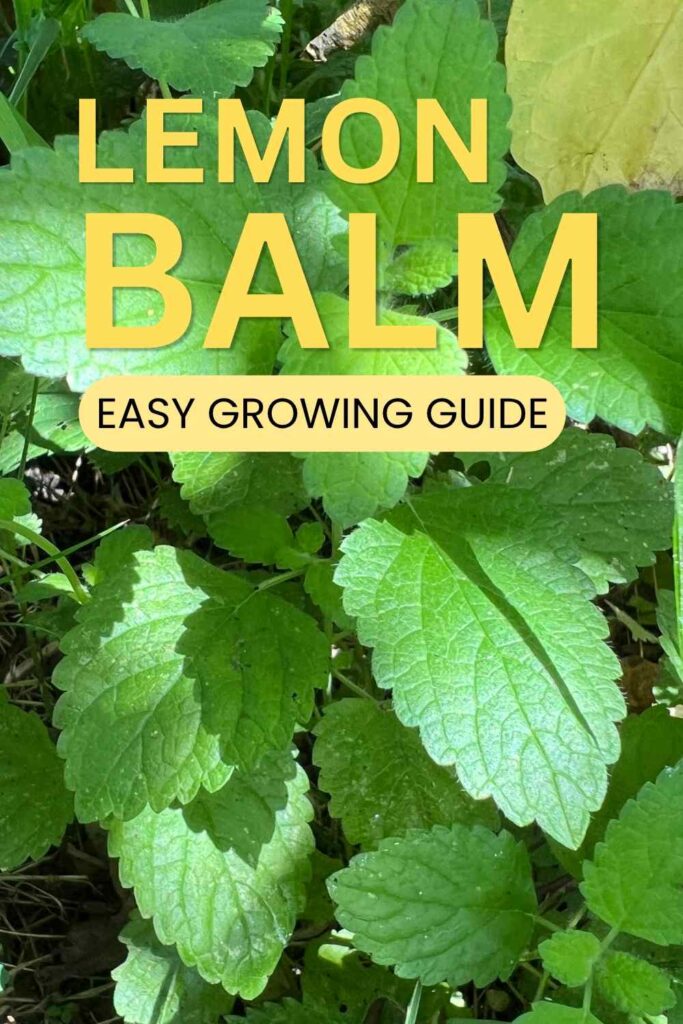
Getting Started With Lemon Balm
Lemon balm doesn’t get as much good press as it deserves.
When someone first suggested I add lemon balm to my herb garden, I was sceptical. It just sounded a bit old fashioned. After all, I have lemon varieties of mint and thyme already. And a bowl full of actual lemons on the counter. Did I really need some extra leaves that also taste like lemon?
It turns out, the answer is yes. And so, probably, do you!
Lemon balm may look a bit like mint at a glance, but it offers a flavor profile that lemon mint just can’t quite match. A warm, soft, lemon without the sharp menthol kick of mint. It makes lovely hot and cold drinks, subtly flavors complex dishes like casseroles and stews. And, my favorite, makes a great addition to summer salads.
With three hungry teenagers to feed, I’m always looking for affordable ways to make supper more interesting. And fresh lemon balm adds a pop of flavor that really does make a difference.
What is lemon balm?
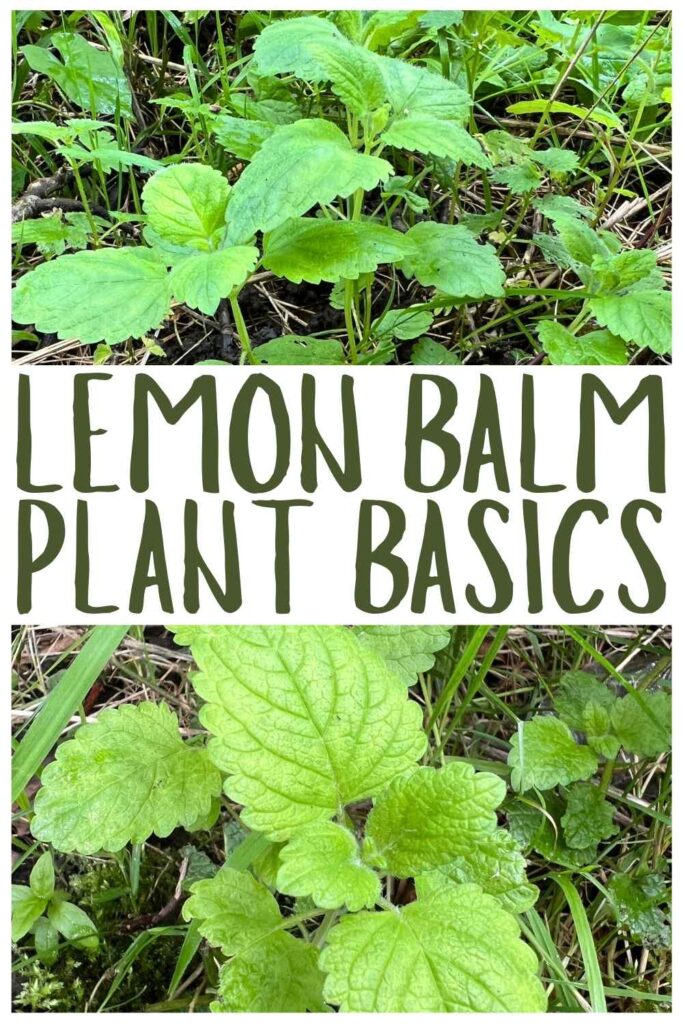
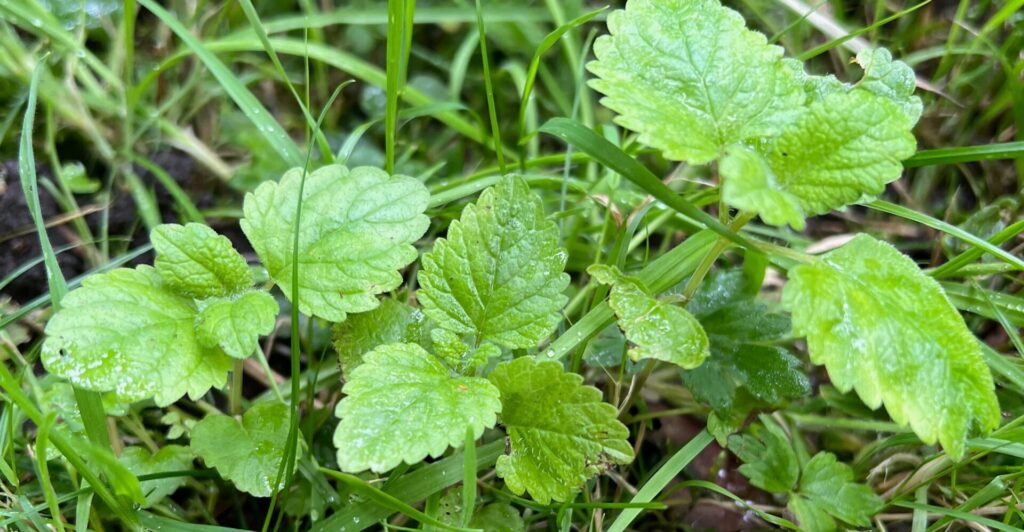
Lemon balm is a perennial herb with soft stems and green, spiky edged, leaves. It grows 2-3 feet tall (60-90 cm) and has small white flowers with a pink or yellow tint, that pollinators love to feed from.
It originates in the Mediterranean, but grows happily across much of Asia, Europe, and North America. It spreads easily by seed dispersal. You may even have some in your yard already, and not yet know it.
I found some hidden in the long grass around the borders of my garden, the summer after I moved in. You’re looking for a plant that looks a bit like mint (they are from the same broader family), but with spikier leaves. Rub the leaves between your fingers and it should release a warm lemon smell with none of the menthol sharpness of mint. Careful! Mine was growing amongst nettles – don’t rub those!
Your first lemon balm plant
Assuming you don’t find any hiding in your borders, the easiest way to get started with lemon balm is to buy a healthy young plant from your local nursery or garden centre. There are lots of different lemon balm cultivars (varieties) with subtly different flavors, so do rub a leaf firmly between your fingers and have a sniff first, before choosing one. It’s worth taking a moment to make sure you’ve chosen the right plant for your tastes.
Alternatively, if a friend has some lemon balm that you like the smell of, you might like to ask them for a cutting, or even talk to them about the possibility of dividing their plant, if it’s a large clump that’s a few years old. To grow lemon balm from a cutting, simply cut the top 4-5 inches from a healthy green shoot that isn’t in flower, strip the leaves from the bottom 3-4 inches, and pop the stripped stem in a glass of water, with the leaves standing above the water. Wait around 4 weeks for roots to appear, let them grow to around an inch long, and then transfer your cutting to a small pot of compost. If you prefer, you can skip the water step and just pop your shoot straight into a small pot of compost, with at least 3 inches stem under the soil. It’s that simple!
The division method is a bit messier, but good fun, and much faster. You and your willing friend will need to carefully dig up their clump of lemon balm, roots and all, and split it. One part for you, and the rest replaced where it came from, or spread into new spots around their garden. Plant your section at the same depth it was in the parent clump, in a sunny spot in your own garden.
Starting from scratch
The final option, for getting started with a new lemon balm plant, is to grow your own from seed. This is more time consuming, and a bit of a fiddle, but can be very satisfying. You’ll need a packet of lemon balm seeds from any reputable brand, and seed tray of compost. Scatter the seeds over the surface and lightly dust them with another layer of compost. Lemon balm seeds need light to germinate, so don’t hide them under deep compost.
Place your seed tray somewhere with a good amount of indirect light, and keep it moist, but not saturated with water. Over watering will rot your delicate seedlings, but too little water will stop them germinating.
Once your seedlings appear, carrying on keeping the compost moist. When they’re sturdy enough to handle, transfer your baby plants into individual pots. Leave them in these “nursery pots”, indoors, until they are 2-3 inches tall and have several adult leaves, then transfer them to their ‘adult’ container. It’s best to wait for late spring or summer to move them outside.
Okay so, now you know how to get your plants started, lets look at how to make them happy!
Surviving vs thriving
Lemon balm originates from southern Europe and northern Africa, where it’s found in mountainous regions. It can survive pretty much anywhere with a warm or temperate climate. But for it to thrive, it helps to recreate those original Mediterranean conditions as much as possible.
Aim to plant your lemon balm in full sunlight, with plenty of space between plants. Good airflow will help your lemon balm plant stay disease free. More sun will help it grow fuller, stronger, and tastier, with more of the aromatic oils that give that citrusy flavor. A lower level of light probably won’t kill your lemon balm, but it will make it grow ‘leggy’ – tall, thin, and bland, as it stretches for that light source. If you’re growing lemon balm indoors, aim for a well lit south or east facing window, or pop your plant under grow lights, to help it bush up.
Mountain cracks and crevices drain well – and lemon balm has evolved to expect the same. You can help your container to drain by planting your lemon balm in a mix of two thirds compost, one third coarse sand. This will also mimic the nutrient poor soil that lemon balm has evolved to thrive in.
Like many mediterranean herbs, once it’s no longer a seedling, lemon balm likes ‘rainfall watering’ – a generous amount of water at once, but then no water for a few days (depending on the weather) to allow the soil to almost dry out. Water when the top of the soil is getting dry, but you can still feel a little moisture when you push your finger into the soil to the first knuckle.
I love plants like this. My lemon balm doesn’t require me to be ready with the watering can on a daily basis. As long as I remember it exists every few days, it’s happy!
Visitors: the good, the bad, and the ugly
Bees love lemon balm too. In fact they love it so much, that the latin name for lemon balm, Melissa Officinalis, comes from the Greek word for honeybee. Lemon balm’s smaller pale flowers may look discrete to you and I, but they make a generous amount of nectar, so rich that it is sometimes planted specifically to feed bees.
And this is a two way street. Lemon balm has been shown to produce more of the essential oils that give it it’s flavor, when it’s been pollinated by bees, than when unpollinated. Which is one of the reasons I like to grow my lemon balm outside, instead of in my kitchen!
Other welcome visitors to lemon balm flowers include hoverflies and butterflies. But what about unwelcome visitors? The good news is, your lemon balm is nearly as good at repelling pest species of insect, as it is at attracting pollinators! The strong smelling oils produced by lemon balm have evolved to deter pests. Studies show that even fairly small amounts of lemon balm compounds put various weevils, potato beetles, and their larvae off feeding, and at higher concentrations lemon balm solutions can even kill some insects.
Lemon balm can still be susceptible to spider mites if it gets too dry, and aphids if it gets overcrowded. And too much humidity around the stems can also leave your plant susceptible to fungal infections like powdery mildew. To reduce the chance of this happening, it’s important to trim your plant regularly… which you can do as part of your lemon balm harvesting.
Trimming and harvesting
Regularly harvesting a few stems from your lemon plant will help it have good airflow, make tasty tender new young leaves, and look tidy and bushy instead of leggy and lean.
I like to cut my stems from the most crowded areas of the plant, to free the other stems up a bit. It’s theoretically fine to take off up to half the height of the whole plant once it’s mature, but I only take a quarter to a third of the height while my plants are young, so they still have plenty of leaves left to produce energy for new growth.
I mainly harvest lemon balm on an ‘as needed’ basis, a few stems here and there, but if it’s starting to look very leggy I trim it back into a neat shape, and ‘invent’ a need for the cuttings in the kitchen!
Top tip: in hotter climes, harvest early in the day for maximum flavor. The oils evaporate as the day goes on!
Using your lemon balm
To make traditional lemon balm tea, you’ll need a teastrainer, filled with a handful of your freshly harvested leaves. Pour on boiling water, leave the cup to stand for about 10 minutes with the strainer in, and then remove the strainer and add a little honey for sweetness. Alternatively, you can make your tea without the strainer, but I find the leaves do float up and get in the way while I’m drinking.
If, like me, you prefer a cold lemon drink, there is an alternative! I like to add a handful of leaves to a pitcher of cold water, and leave it to steep for an hour or so. Serve over ice for a lovely summer treat!
And lemon balm is not just great in drinks. My favorite use for the leaves is in salads, but you can throw a little into any stew, stirfry or casserole you’re making, that would benefit from a pop of lemon. Experiment, and have fun finding out your families favorite way to eat it!
Preserving your extra leaves
In the unlikely event that you harvest more lemon balm than you can eat the same day, you can wrap them in a damp tea towel or paper towel, and pop them in the fridge, to get a few more days from them.
Outdoors, your lemon balm will die back in the winter, so you may like to do a bigger harvest at the end of summer, and freeze or dry some of the leaves for storage. To freeze, drop chopped leaves into an ice cube tray, cover them in water, and pop them in the freezer. Once they’re solid you can tip them into a labelled freezer bag to defrost as needed. If you want to be able to drop your cube into a stirfry or other hot oiled pan, you may prefer to freeze your leaves in oil instead of water.
Alternatively, you can hang your lemon balm up to air dry and then seal the crushed leaves in an airtight jar. This takes up less storage space but, fair warning, a lot more of the flavor does tend to be lost when you do this, because the plant’s oils are lost along with the water.
If you do opt to air dry, the slower your leaves dry, the less oil will tend to be lost, and the better the flavor will be. So don’t blast them in a warming oven!
Your future plants
Lemon balm seeds get everywhere. If you don’t want more plants next year, prune off any flowers that are turning to seed.
If you do want to increase your lemon balm supply, taking cuttings from your existing plant and propagating them in water will be your fastest route. My own lemon balm is planted in my garden borders, and is allowed to spread a little in that zone. Once it gets into other beds, I treat it as a weed! Unlike mint, it doesn’t spread from the roots, so it’s fairly easy to remove. I consider the weeding a fair price to pay for the bees and butterflies that visited the flowers while it was making seed!
All in all, lemon balm is very low maintenance. It’s forgiving of forgetful gardeners and sporadic watering, brings pollinators into your yard, and tastes delicious.
I have no regrets about adding it to my herb garden – and I’m sure you’ll love it too!
References
“Lemon Balm, Melissa officinalis”. Wisconsin Horticulture https://hort.extension.wisc.edu/articles/lemon-balm-melissa-officinalis/
“Lemon-Scented Herbs in the Garden and the Kitchen”. Penn State Extension. https://extension.psu.edu/lemon-scented-herbs-in-the-garden-and-the-kitchen
“Olfactory Influences on Mood and Autonomic, Endocrine, and Immune Function”. Kiecolt-Glaser et al. Psychoneuroendocrinology. 2008. https://pmc.ncbi.nlm.nih.gov/articles/PMC2278291/
“The Impact of Honey Bee Pollination on the Amount of Essential Oils”. Radev. Agriculturae Conspectus Scientificus. 2022. https://hrcak.srce.hr/284045
“Lemon Balm”. Illinois Extension. University of Illinois. https://extension.illinois.edu/herbs/lemon-balm
“Pollinator-Friendly Native Plant Lists”. Xerces Society for Invertebrate Conservation. https://xerces.org/pollinator-conservation/pollinator-friendly-plant-lists
“The Effects of Water Extracts from Lemon Balm on Pea Leaf Weevil and Black Bean Aphid Behaviour”. Rusin & Gospodarek. 2018. Journal of Ecological Engineering. https://www.jeeng.net/the-effects-of-water-extracts-from-lemon-balm-on-pea-leaf-weevil-and-black-bean-aphid,91978,0,2.html
“The Effects of Water Extracts from Lemon Balm on Colorado Potato Beetle Behaviour”. Rusin & Gospodarek. 2018. Journal of Ecological Engineering. https://www.jeeng.net/The-Effects-of-Water-Extracts-from-Lemon-Balm-on-Colorado-Potato-Beetle-Behaviour,91266,0,1.html